Single-machine deployment
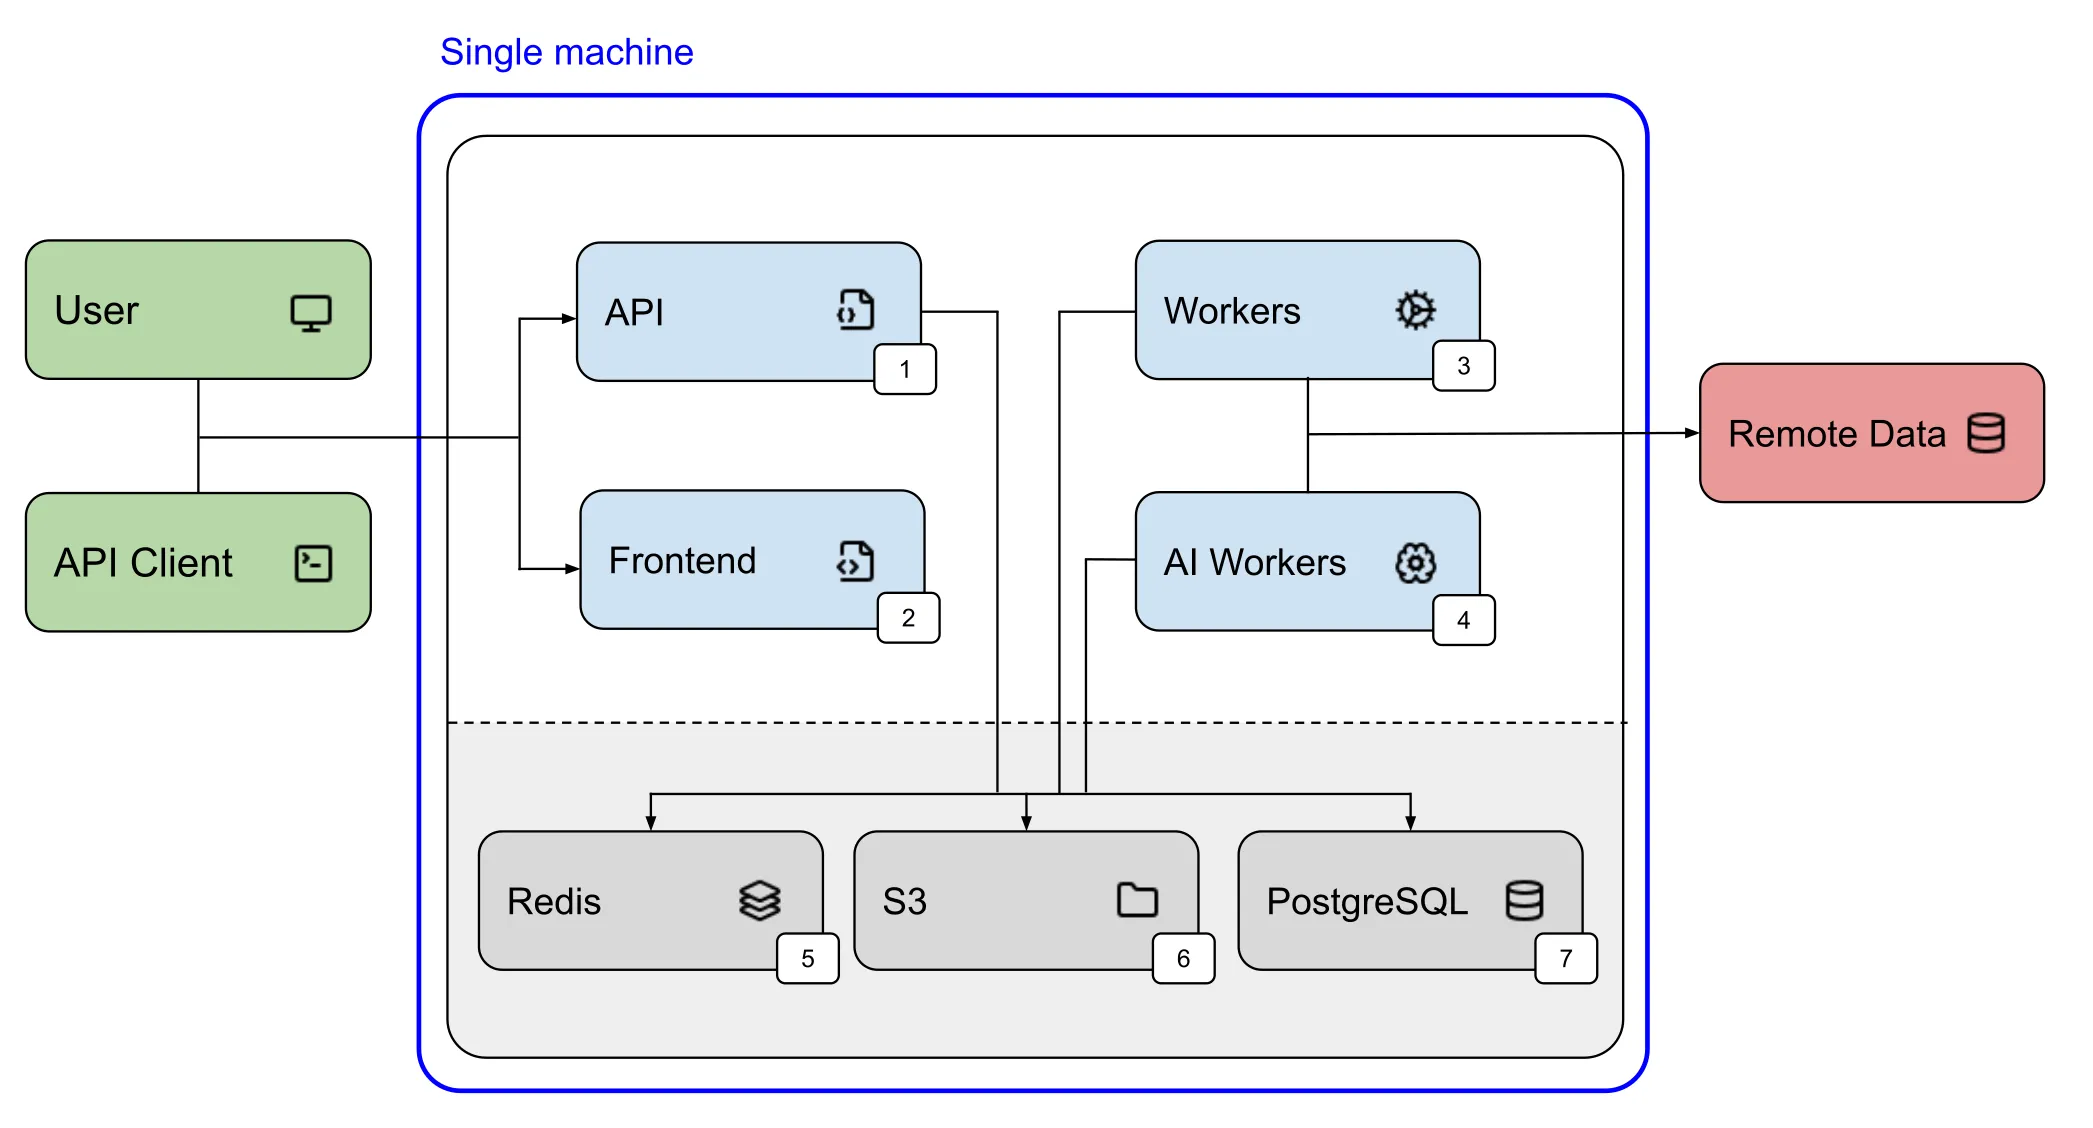
A single-machine deployment provides the same components as a multi-node setup, with all services running on
a single machine.
Based on the architecture outlined in the dedicated section,
a single-machine deployment can be represented as follows:
This page provides instructions for installing, updating, and uninstalling the Aindo Synthetic Data Platform in a single-machine setup.
Installation
Step 1 - Install k3s
The first step is to install k3s, a lightweight Kubernetes distribution capable of running on a single node. For comprehensive installation instructions, refer to the official documentation. To install k3s on an Ubuntu server, the key steps are the following:
sudo apt-get updatesudo apt-get upgradecurl -sfL https://get.k3s.io | INSTALL_K3S_EXEC="server" sh -s - --disable traefikTo confirm that k3s is running, use this command:
sudo kubectl get nodesThe expected output should be similar to:
NAME STATUS ROLES AGE VERSIONip-172-31-22-230 Ready control-plane,master 1m v1.31.4+k3s1Step 2 - Install the NGINX controller
Next, we install the NGINX ingress controller using a Helm chart. Create
a YAML file named nginx.yaml with the following content:
apiVersion: helm.cattle.io/v1kind: HelmChartmetadata: name: ingress-nginx namespace: kube-systemspec: repo: https://kubernetes.github.io/ingress-nginx chart: ingress-nginx createNamespace: true version: 4.12.0 targetNamespace: ingress-nginx valuesContent: |- controller: ingressClassResource: default: trueApply the configuration using:
sudo kubectl apply -f nginx.yamlTo check that the NGINX controller is running, execute:
sudo kubectl get pods -n ingress-nginxand the output from the command line should look like this:
NAME READY STATUS RESTARTS AGEingress-nginx-controller-7657f6db5f-gblxh 1/1 Running 0 23sStep 3 - Configure the Storage class
The third step involves creating a storage class with a Retain reclaim policy.
Create a YAML file named storage.yaml with the following content:
apiVersion: storage.k8s.io/v1kind: StorageClassmetadata: name: local-path-retainprovisioner: rancher.io/local-pathreclaimPolicy: RetainvolumeBindingMode: WaitForFirstConsumerApply the configuration using:
sudo kubectl apply -f storage.yamlTo verify that the storage class is available, run:
sudo kubectl get storageclassThe output should look similar to this:
NAME PROVISIONER RECLAIMPOLICY VOLUMEBINDINGMODE ALLOWVOLUMEEXPANSION AGElocal-path (default) rancher.io/local-path Delete WaitForFirstConsumer false 2mlocal-path-retain rancher.io/local-path Retain WaitForFirstConsumer false 6sStep 4 - Create the namespace and the pull secret
Create the aindo namespace with:
sudo kubectl create namespace aindoTo verify that the namespace was created:
sudo kubectl get namespace aindoThe output should be similar to this:
NAME STATUS AGEaindo Active 2sNext, create the docker-registry-secret secret using the credentials provided by Aindo:
sudo kubectl create secret docker-registry docker-registry-secret -n aindo --docker-server=https://index.docker.io/v1/ --docker-username=DOCKER_USER --docker-password=DOCKER_PASSWORDTo verify that the secret has been created, run:
sudo kubectl get secret docker-registry-secret -n aindoExpected output:
NAME TYPE DATA AGEdocker-registry-secret kubernetes.io/dockerconfigjson 1 2sStep 5 - Deploy the Aindo Synthetic Data Platform
Create a YAML file named aindo-deploy.yaml with the following content:
apiVersion: helm.cattle.io/v1kind: HelmChartmetadata: name: aindo-release namespace: aindospec: chart: oci://registry-1.docker.io/aindo/aindo-data-platform version: 1.2.1 dockerRegistrySecret: name: docker-registry-secret targetNamespace: aindo valuesContent: {}Update the valuesContent field with the specific configuration for your deployment.
Deploy the Aindo platform by running:
sudo kubectl apply -f aindo-deploy.yamlTo verify that the application has been deployed:
sudo kubectl get pods -n aindoThe expected output should look like this:
NAME READY STATUS RESTARTS AGEaindo-aindo-data-platform-api-84d9fb9f86-l5j7l 1/1 Running 0 2maindo-aindo-data-platform-fe-deploy-5c99d989bf-44j8g 1/1 Running 0 1maindo-aindo-data-platform-worker-ai-b9897ccbb-spjsk 1/1 Running 0 1maindo-aindo-data-platform-worker-default-9898f5b8b-5lvb8 1/1 Running 0 1maindo-aindo-data-platform-worker-dlq-5544d77-m92ht 1/1 Running 0 1maindo-minio-fc6875df-zlqld 1/1 Running 0 2maindo-postgresql-0 1/1 Running 0 2maindo-redis-master-0 1/1 Running 0 2mUpdating
To update the deployment, apply required changes to the aindo-deploy.yaml file and run:
sudo kubectl apply -f aindo-deploy.yamlUninstallation
To uninstall the deployment, run:
sudo kubectl delete -f aindo-deploy.yaml